In 2020 I shared this post on how to make a coin bank. It was for my daughter, and now that I have a son, I just had to make one for him too! The overall concept is the same but I did a few things differently and wanted to share the ideas, and a pattern.
Materials
Container w/ clear plastic lid (I used a baking cocoa container)
Felt – 1 sheet (for sand; cream-colored)
Animal Figurine (turtle, fish, etc. I painted an eraser!)
Clear Plastic Straw
Artificial Flowers (w/leaves & stems)
Acrylic Paint/Paintbrush (optional)
Paper (colored, scrapbook or wrapping paper for bottom)
Lamination Sheet
Small Rocks (can get a bag at Dollar Tree)
Small Beads, Small Seashells, etc. (optional)
Supplies
Xacto Knife/Cutting Mat
Printer/copy paper (if using pattern)
Fabric Scissors & Paper Scissors
Fabric Pins (if you find that helpful)
Hot Glue Gun/Hot Glue Sticks
Tacky Glue
Side note…Did you know plastic straws are AWFUL for the environment? I once saw a horrifying video of someone removing a plastic straw wedged up inside the nose of a poor sea turtle. I also saw a sign at an aquarium that read, “IT’S ONLY 1 STRAW…SAID 18 MILLION PEOPLE.” It’s a problem! So I don’t use straws at restaurants, but if I have one from a drive-thru, I wash it after using and save for crafting.
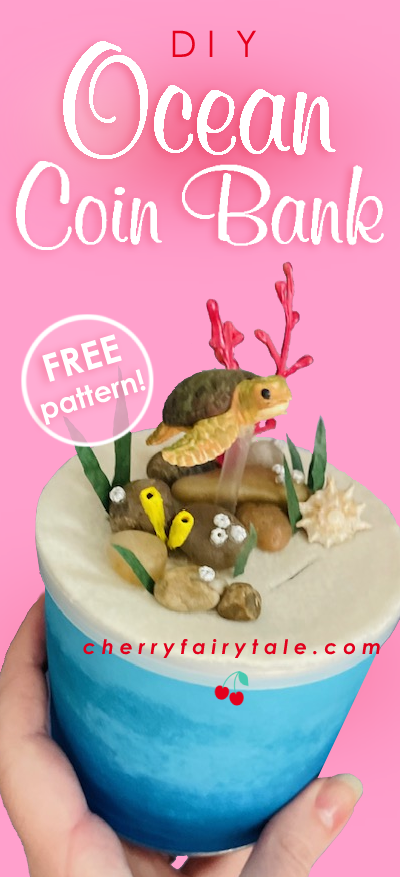
STEP 1 – LID
Here is a FREE pattern if you’re using a container with a 4 1/8″ size lid. If not, it’s just a circle with a hole in the middle (for the felt for the straw) and a thin, rectangular coin slot hole which is 1/8″ x 1.” If making your own pattern, trace the lid (top-down) onto some paper, cut out, fold in half evenly twice to find the middle, and draw the coin slot parallel to the diameter line.
Cut the coin slot opening in the lid using the Xacto knife/mat.
Cut out the circle in the felt with the fabric scissors. Cut the small hole in the center (so the straw can be glued directly to the lid).
Instead of cutting another rectangular hole for the coin slot in the felt, just make one cut 1″ long in the spot of the coin slot. If you find it helpful, use pins to mark the 2 ends and fold, meeting the 2 pins together, and cut on the fold.
Lining up the slot holes, hot glue the felt to the plastic lid. You can easily line it up by laying down the felt then pressing the glue-covered lid down to it, looking through the clear plastic.
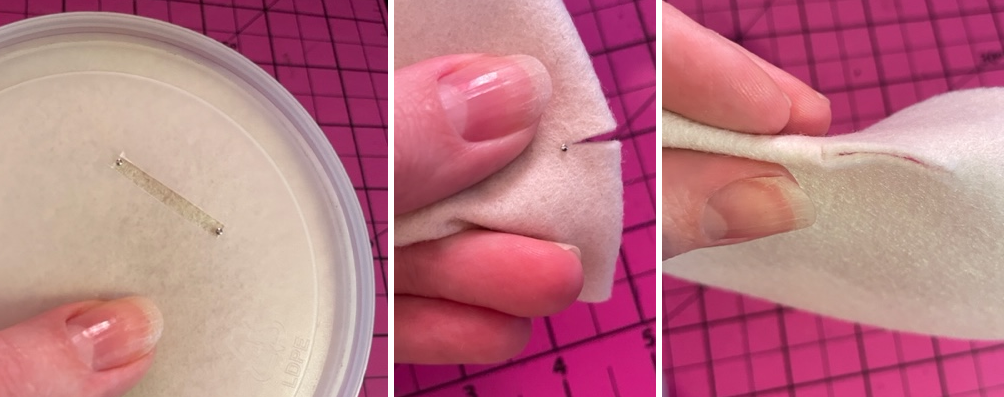
STEP 2 – FIGURINE
Cut about 1 1/2″ piece of straw and cut one end at an angle (if you wish the figurine to be angled). Hot glue the angled end to your figure (unless you need to paint it first…I painted a turtle eraser that was actually solid yellow with a pink shell). Then glue the bottom of the straw to the middle of the lid at the opening.
Hot glue small rocks around the straw.
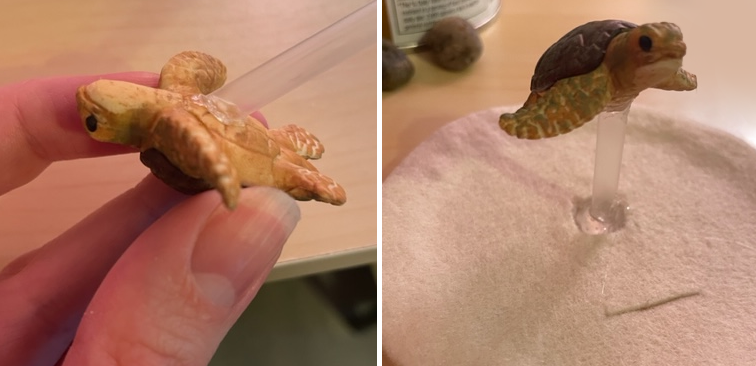
STEP 3 – TRIMS
Remove the plastic backing from an artificial leaf and cut the leaf into 1/4″ strips with pointed ends (using fabric scissors). Glue the bottom straight edge to the felt to create seaweed (and yes, I am wearing my Christmas pajamas in the photos, hehe).
You can also use the plastic parts of the artificial flowers to create coral:
- Leaf backing: round the tips with hot glue, then paint (I painted red)
- Stem below the flowers: Pull off the flowers then paint the stems (I painted yellow) then trim to desired length
Glue these pieces between/around the rocks as you like. Add small seashells or painted beads to look like barnacles.
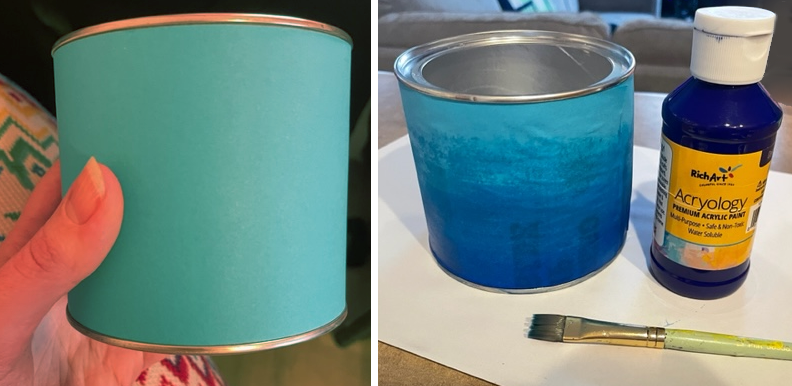
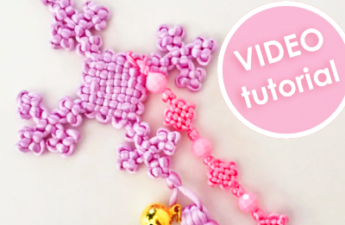
STEP 4 – BOTTOM
Now that the lid is complete, time to decorate the bottom! Use whatever paper you like…colored, scrapbook paper, wrapping paper, etc. I didn’t find it necessary to remove the container label…just cover over! Measure the height and length (circumference) and cut out your paper in the same size (it’s a good idea to add a little extra to the length to overlap the edge). I used a bright blue school flyer to up-cycle! Letter size isn’t long enough so I cut 2 strips. I then glued it to the label with tacky glue (I spread the glue around so it’s smooth and flat instead of lumpy), and painted it ombre with some deep blue acrylic paint and water. Lastly, once dry, I covered with a lamination sheet to protect it. Before this last step, you may wish to add more decorations like stickers or write a name, but I kept mine simple (I’m trying to follow the “less is more” rule in my creations lately)!
Which animal did you go with? Who is the lucky recipient? Let me know with a comment!