***UPDATED 2/2026***
Revised Pattern & Video Tutorial added!
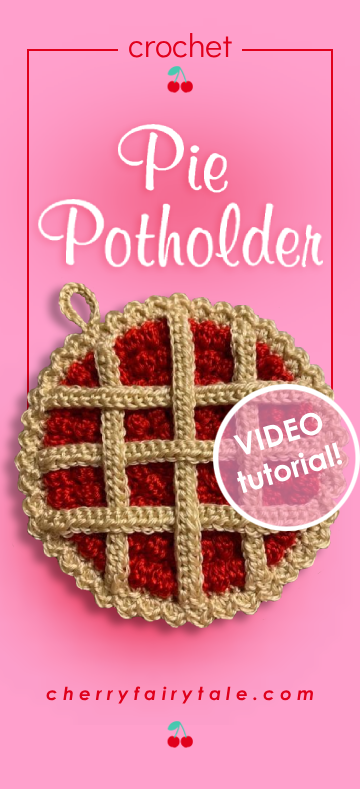
If I told you I have a theme for my kitchen, I’m sure you can guess what it is! My yarn group shared a photo of a crochet pie potholder and I knew I had to make a cherry one. But I wanted it to have bumpy berry shapes, so I found the Bobble Stitch, my new favorite.
After I finished I shared a photo with my yarn group and was (pleasantly) surprised there was so much interest, so I am sharing my pattern for everyone here! There are various patterns out there already, so this is my version, and you can change it if you like. I love the bumpy berries but maybe you’d like more simple with a flat ‘filling.’ Maybe you’d like more lattice on top. Or not at all. Maybe your taste is more blueberry or raspberry. Make it the way you like!
MOST IMPORTANTLY, if you are going to use as a real potholder, it will need to be made of COTTON or WOOL YARN to handle high heat. I made mine more as a decoration with acrylic…I don’t plan on using it in the oven at all. Acrylic yarn is synthetic material so it melts instead of burns. If the cotton gets too hot, it burns away. Another flat, circular layer on the bottom may also help (in the crust color).
Skill Level: Intermediate
KEY
C = Color
R = Round/Row
MC = Magic Circle
SC = Single Crochet
SL ST = Slip Stitch
STS = Stitches
CH = Chain
BB = Bobble
inc = Increase (2 single crochets in same ST)
YO = Yarn Over
ST = Stitch
FO = Fasten Off
HDC = Half Double Crochet
DC = Double Crochet
SK = Slip Knot
Start with your berry color and use the bobble stitch. The bobbles may naturally pop out to the back side of your work; you can push them to the front as you go if you prefer, but this may be too difficult with cotton yarn, so keep in mind on which side the bobbles will face up when it’s time to add the pastry.
How to do a Bobble Stitch (BB): YO, insert hook, pull thru, YO, pull thru 2 loops; Repeat 3 more times for total of 4; Complete with YO and pull thru all 5 loops)
C1: Berry (Red)
C2: Pastry (Beige)
C1:
R1: MC, 6 SC into Magic Circle, SL ST to join = 6 STS (not counting SL ST)
R2: CH 1, (1 SC, 1 BB in SAME ST) x 6, SL ST = 12 STS
R3: CH 1, 12 inc, SL ST = 24 STS
R4: CH 1, (1 SC, 1 BB in NEXT ST) x 12 SL ST = 24 STS
R5: CH 1, (1 SC, 1 inc) x 12, SL ST = 36 STS
R6: CH 1, (1 SC, 1 BB in NEXT ST) x 18, SL ST = 36 STS
R7: CH 1, (2 SC, 1 inc) x 12, SL ST = 48 STS
R8: CH 1, (1 SC, 1 BB in NEXT ST) x 24, SL ST = 48 STS
R9: CH 1, (3 SC, 1 inc) x 12, SL ST = 60 STS
R10: CH 1, (1 SC, 1 BB in NEXT ST) x 30, SL ST = 60 STS
Now for the outer pastry!
C2:
R11: CH 1, 60 SC, SL ST = 60 STS
R12: (In same ST: 1 HDC, 1 DC, 1 HDC; SL ST in NEXT ST) x 30; SL ST = 120 STS
CH 10 to create a loop, knot and FO
Next is the lattice pastry. (It also looks cute without if you prefer!)
The length may need to be adjusted based on the gauge.
To calculate the right length for your pie, make the chains and lay it across the pie, then add 2 chains to allow for turning.
LARGE Lattice (2 middle pieces)
SK, CH 27, 25 SC (starting on the 3rd CH from the hook), FO = 25 STS x 2
Repeat to make a second lattice piece.
SMALL Lattice (4 side pieces)
SK, CH 25, 23 SC (starting on the 3rd CH from the hook), FO = 23 STS x 4
Repeat 3 more times to make 4 total small lattice pieces.
Layer the pieces like a basket (over, under, over, under).
Use a yarn needle to sew the pieces to the crust edge.
Backing (optional)
Adding a backing adds an extra layer of protection and completes the bottom pastry but is your preference to make or not!
C2:
Tie down where the lattice overlaps from the back side of the bobble stitches to secure.
R1: MC, 6 SC into circle, SL ST = 6 STS
R2: CH 1, 6 inc, SL ST = 12 STS
R3: CH 1, (1 SC, 1 inc) x 6, SL ST = 18 STS
R4: CH 1, (2 SC, 1 inc) x 6, SL ST = 24 STS
R5: CH 1, (3 SC, 1 inc) x 6, SL ST = 30 STS
R6: CH 1, (4 SC, 1 inc) x 6, SL ST = 36 STS
R7: CH 1, (5 SC, 1 inc) x 6, SL ST = 42 STS
R8: CH 1, (6 SC, 1 inc) x 6, SL ST = 48 STS
R9: CH 1, (7 SC, 1 inc) x 6, SL ST = 54 STS
R10: CH 1, (8 SC, 1 inc) x 6, SL ST = 60 STS
R11: CH 1, (9 SC, 1 inc) x 6, SL ST = 66 STS
R12: CH 1, (10 SC, 1 inc) x 6, SL ST = 72 STS
R13: CH 1, (11 SC, 1 inc) x 6, SL ST, FO = 78 STS
When rows are completed, FO leaving a long tail & sew around the edge on the back side, keeping the other yarn tails to the inside. Pull the tail to the inside when done.
Special shout-out to my yarn group for all the love, help & support! You all are the best and I continue to be inspired by you daily.
Did you make a cherry pie potholder? Blueberry? Let me know with a comment!


What hook size do you recommend.
Hi! I used an H hook (5mm) but you can use whatever size you prefer, or just what is recommended on your yarn label.
I’m just starting the cherry pie pattern…it says 4BB in each stitch for a total of 12 stitches…there are 6 stitches in the magic circle…wouldn’t that make it 24 total? I’m probably misunderstanding…not sure
Hello Earlene, I think I confused you with the pattern, I’m sorry! I have now corrected it. It should say ‘1 BB,’ not ‘4 BB.’ I had it in my head that when you make a bobble stitch, you yarn over 4 times. So the first step is a magic circle of 6 (SC) stitches, then when you start the bobble (BB) stitch, you do 1 SC then 1 bobble into each of the 6 stitches, making a total of 12 stitches. I’m sorry for the confusion but I hope you can keep going…thanks for your question!
How mamy small balls of cotton yarn will i need to complete this?
I’m not sure what small would be, but I was able to make a few with one skein of each color.
In step 6, we agree that there is 24.
Using your pattern SC2 around would lead to 48.
Did you mean to “SC2 and then SC1” and repeat?
Hello Holly, I believe the pattern is correct as written…step 6 is an alternating SC then BB pattern all the way around. The previous row also had 24 STS; it is a slow increase with every 2 rows having the same number of stitches (next is 36, 36, 54, 54, 81, 81). Hope that makes sense!
Ive done this four times now and all my stitches are accurate and everything is smooth until the last row of bobble stitches, when I finish that 5th row, the entire thing warps and won’t laugh flat 🙁
Mine looks pretty warped too, but by the end it flattens out, so maybe try just finishing and seeing if you can smooth it out after?
This pattern is very difficult to understand. While I have successfully created the piece, there was a lot of guesswork involved, and inconsistent addition/stitch count among the rounds. Please consider rewriting it to be more clear, straightforward, and consistent with standard terminology, e.g. “INC” for Increase Stitch, opposed to “SC2”.
Eek, your comment was buried in my spam from years ago! You are quite right and I hope you’ve seen the updated pattern and added video. I had asked in the Yarn Wars group for feedback so thanks if you did that!
Love your pattern using bobble. It looks more realistic. Thank you for sharing. You did great for a beginner. I have been crocheting for over 60 years so please accept my compliment.
Thanks so much! I created this pattern when I was still pretty new to crochet, so I’ve actually simplified the pattern and organized it better into rows. But I really appreciate it!
This was so fun to make! I posted the results on my Instagram!
So happy to hear that! Thanks!
Hi, what size yarn do you use? I might be little late 💙
I used a medium size, 4 I think.
Kat, what is the size /diameter of the completed trivet? Thank you,
Mine is about 7.5” but it will of course depend on the size of your yarn and hook. You can make it smaller or larger too.