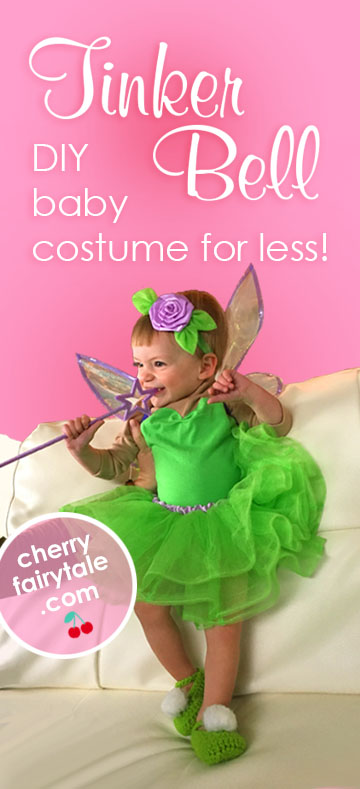
Halloween is just around the corner, and what is cuter than Tinker Bell for a baby girl costume?! Tink is one of my all-time favorite Disney characters. When I was a doll designer, I was thrilled I got to develop the Disney Fairies porcelain doll collection. I made the art for their eyes, patterned their tiny clothes, and picked out the fabrics and embellishments.
When I found light-up wings, I decided Lily could be Tinker Bell for the next Halloween (before she starts to let me know herself what she’d like to be). This baby version of Tinker Bell I put together is SOOO cute, fun to make, and inexpensive. I’ve never cared much for store-bought costumes because they don’t look right, are way too cheaply made, and too much money for the low quality. You can spend half as much and make something way better. Here’s the breakdown step-by-step of each piece of Lily’s Halloween costume…duplicate each one or pick and choose what you like best, from head to pom-pom toe.
Headband
Some people make blonde Tinker Bell wigs for the full Disney look, but I wanted Lily to still look like a baby so I went with a headband instead.
Materials
Lime green tulle (buy a small roll – the same used for the tutu)
1.5″ light purple satin ribbon (also the same used for the tutu)
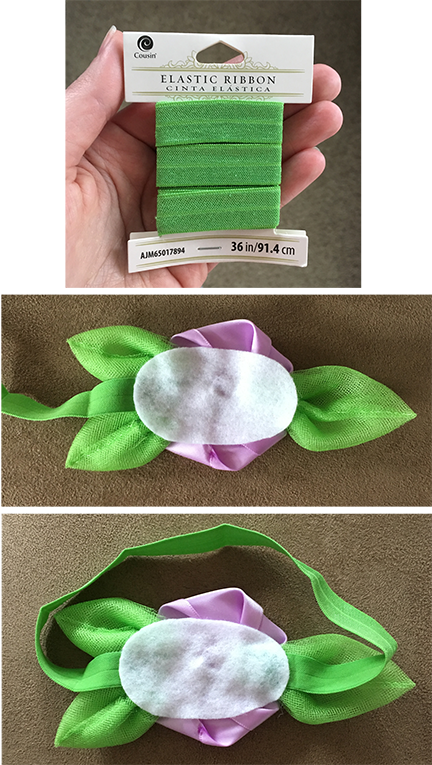
1/2″ wide green elastic ribbon ($1 at Walmart)
A square of green felt
Hot glue gun / hot glue sticks
Needle & thread
This video I found shows how simple it is to make a pretty ribbon rose.
For the leaves, cut 2 pieces of tulle 5″ x 5″ and one piece 6″ x 6.” For each piece, fold in half, then in thirds, then fold 2 sides to meet in the middle, overlapping slightly, to form a triangle (with the open edges on the bottom). Hand-stitch down the overlapping middle. Pinch bottom edge together in a way that you like and stitch closed. Hot glue to the back of the ribbon rose.
Cut a length of elastic ribbon and hot glue right sides down to the sides of the rose/leaves. It should be snug on the baby’s head but not too tight – I used 13.5.” Cut a piece of felt in the shape you need to cover the back of the rose/leaves, but not show from the front (I didn’t have green so I used white), and hot glue it to the back of the rose/leaves and elastic ends. Done!
Star Wand
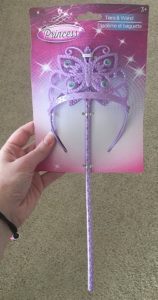 I got it it for $1 at Dollar Tree! I LOVE Dollar Tree. It came with a crown too, but that can just go in the dress-up box for later. My main reason for adding the wand was to give her something to hold instead of trying to remove her headband and shoes. The light purple color goes with it perfectly. If you’re not sure where the nearest Dollar Tree is to you, here’s a link to their store locator.
Wings
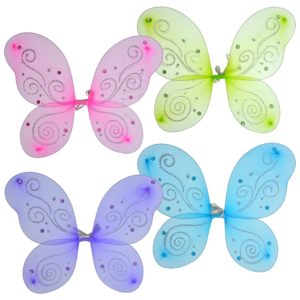
Dollar Tree has really adorable fairy wings in the perfect size…for a dollar, of course! Or if you are lucky like me, you might find some wings at a consignment store. Or if you’d like a big project, you can make your own with poster board and cellophane. I got Lily’s Disney Fairies light-up color-changing wings used for $5, but if budget is not a concern, you can buy them new from Amazon at the link below.
.
Bodysuit
I didn’t want Lily to be cold so I got a beige-colored bodysuit (from Amazon – link below) to look like skin but keep her warm (like an ice skater costume). If you live in a warmer area, you can skip this part and just sew straps on.
Materials
Beige bodysuit (optional)
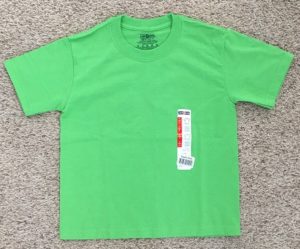
Lime green fabric (I got a toddler T-shirt at Dollar Tree…for yes, $1! Did I mention I LOVE Dollar Tree?!)
Lime green thread
Paper/Pen/Ruler
Paper Scissors & Fabric Scissors
Pins, Needle
Sewing machine
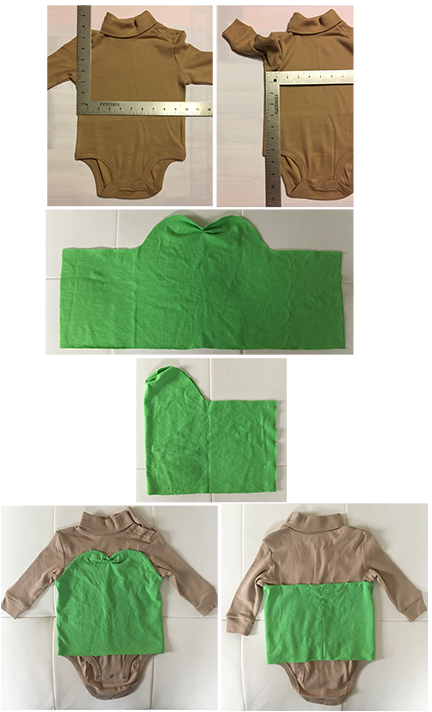
Start by making a pattern by measuring the bodysuit. First, measure the side from the armpit to the bottom edge. Next, measure the waist across the front. Draw a rectangle with these measurements. Now we need to add a little more to the chest to make the sweetheart neckline. Extend the side measurement up about 3 inches, then curve it down to the halfway point of the top of the waist measurement. Add 1/4″ to the top and left for seam allowance (the bottom already has it included and the right side will be your fold line).
Pin the pattern to the fabric, placing the right edge of the pattern to the fold of the fabric, and cut it out. Leaving 1/4″ for seam allowance, pinch the top center front and tack to make the sweetheart neckline.
Pin the center back together, and sew 1/4.” Turn it right side out and pin it at the top to the bodysuit, turning the edge under 1/4″ and top stitch. Turn the bottom edge under and top stitch it also. Done!
Tutu
I reconstructed a tutu I bought on consignment because it was so sad looking and no one would buy it. It was half off because no one would even pay $2 for it. It was the perfect color & size with the elastic already included, but I had to untie and iron each small piece, then sew them together. It’s much better to simply buy a new roll of tulle and make your own.
And can I just say…on the no-sew tutus…DON’T DO IT. They are cute for one day, then the netting edges all stick together and it becomes a sorry little blob that once pretended to be a tutu. Even in their prime, they don’t move like a tutu should. If your argument is that you don’t sew, it would still be better to just buy a tutu already made. If you don’t have any experience sewing, it’s best to just buy one instead, but if you like sewing, this is a pretty easy project.
Materials
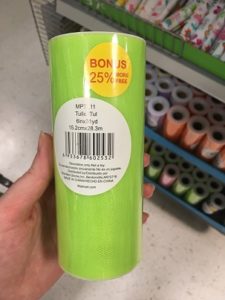
1 roll of lime green tulle (they are typically 6″ wide)
Thread
Scissors
3/4″ Wide Elastic
1.5″ Light Purple Ribbon (same from headband rose)
Sewing Machine
Measure the baby’s waist so that it is snug and not too tight (or see sizes below) and add 1″ for seam allowance (1/2″ for each end). For the tulle layers, cut about 6 pieces of tulle of that length to make a nice, fluffy tutu. It looks extra nice if the layers are gathered separately, but 2 at a time is okay. The longer pieces you use, the fluffier and fuller the tutu will be. I would cut at least 3 yards per piece but you can decide what you like. You can also cut the edges into points if you’d like the leafy skirt look that Tink has. To sew…
- Stretch the elastic to full stretch you will do when sewing, and measure it
- Cut a piece of ribbon to that length
- Pin ribbon right side (shiny side) down to elastic at ends, then at middle point, then at 2 quarter points
- Sew together, stretching the elastic with both hands on either side of the presser foot flat to the ribbon
- Sew a basting stitch (the widest possible stitch) on one edge of 2 layers of tulle
- Pull one thread to gather tulle to the length of the elastic when it is stretched
- Repeat for 2 more double layers of tulle
- Turn ribbon up and over elastic edge so that is right side up with seam now hidden inside
- Pin the 3 double layers of tulle on top of the ribbon/elastic, covering it (outer tulle edge toward ribbon-covered elastic edge)
- Sew tulle layers on top of ribbon/elastic, stretching the same way as before
- Sew ends together to form a circle…done!
Waist Sizes
6-9 Months 18″ – 19″
12-18 Months 18.5″ – 19.5″
2T 19″ – 20″
Crochet Slippers
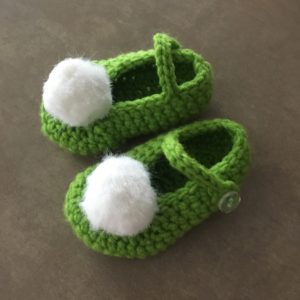 These were so fun to make and pretty easy, too! If crochet isn’t your thing, you can just get a pair of green shoes and add the pom-poms, or sew them using the leftover fabric from the T-shirt. I used a 5mm crochet hook (size H) and size 4 (medium) yarn and they came out pretty large, so I followed the 3-6 months size pattern and they came out in the 9-12 months size. The first video below shows how to do 4 different sizes for the soles, and the second video shows the complete making of the shoe, in 0-3 mo. size. My written pattern is for 3-6, but if you are doing 0-3, you can skip the first video.
Materials
Lime green yarn & matching thread
Crochet Hook
2 Clear (or matching color) 9/16″ Buttons
Needle & Thread
Scissors
White Fabric
Stuffing (optional)
Crochet Terms Key
CH = Chain
ST = Stitch
STS = Stitches
SL ST = Slip Stitch
DC = Double Crochet
SC = Single Crochet
HDC = Half Double Crochet
BLO = Back Loop Only
EXT SC = Extended Single Crochet
PART 1 – Sole
SL ST, CH 11
3 DC in 3rd chain from hook
7 DC, 6 DC into last ST, 7 DC
3 DC in last ST, SL ST
= 26 total STS
CH 1, 2 HDC in next 3 STS
5 HDC, 1 DC, 2DC in next 8 STS
1 DC, 5 HDC
2 HDC in next 3 STS, SL ST
(Do not cut yarn here as in video…continue to next part!)
PART 2 – Upper Shoe
CH 1, 40 SC (BLO), SL ST, CH 1, 40 SC, SL ST
CH 1, 12 SC, Skip next ST
8 EXT SC, Skip next ST, 12 SC, SL ST
CH 1, 12 SC, Skip next ST, 4 HDC (skip a ST between all)
12 SC, SL ST
PART 3 – Strap
CH 1, 5 SL ST (This will be for right shoe. For left shoe, SL ST until there are only 5 STS remaining. This puts the strap closer to the ankle — in the video it’s closer to the toe)
CH 16 (to make strap), SL ST into 6th ST from hook (to make button hole)
10 SL ST (back along strap)
SL ST all the way to the end
PART 4 – Buttons & Pom Poms
Sew a button to the outer side of each shoe (CAUTION: SMALL PARTS/CHOKING HAZARD! Sew on as securely as possible, and always be sure the baby cannot remove the buttons)
Cut 2 circles (3″ in diameter) of white fabric. I used faux fur but fleece, stretch velvet, or velour would all work well too. Hand-stitch around edge then pull tight to gather. I didn’t need to add stuffing because I stitched about 1/2″ from the edge and turned it inside to fill it. Knot closed and sew to the toe of each shoe. Trim excess fur if needed.
And that’s the full fairy frock! Which pieces will you use this Halloween? Let me know with a comment!


Hi could you tell me if you have a pattern for preemie babies please thanks
Hello! I don’t, but if you’re unable to find one, you can always make a smaller version by using a smaller hook and yarn. I had to try a few different sizes. I hope this helps!