Out of all my quarantine crafts, this was the one I’m really happy to finally get done!
Big storage baskets/ottomans are so handy, pretty, and…expensive! I love the ottomans Ali Manno shared in her family room blog post, but I don’t have an extra $300 sitting around to spend, and I didn’t think it would cost much or take too much effort to do it myself, and be fun to make. Weeelllll…it wasn’t cheap (100′ of cotton rope was about $40 on amazon), and I didn’t realize it takes a LOT of rope. I started with a lid, realized I wouldn’t have enough rope left for the rest, and UN-glued it, which started to turn me into an ACTUAL basket case. But I learned, so with that knowledge it should not be too tough or spendy for you.
Materials
1/2″ Cotton Rope (at least 100′)
2 Laundry Baskets (I got mine at Dollar Tree)
Muslin or Cotton Fabric (for lining) & Thread
White Duct Tape (can also get at Dollar Tree)
Supplies
Hot Glue Sticks/Hot Glue Gun
Scissors (Regular & Fabric)
Clippers
Ruler or measuring tape
Pen or fabric chalk
Sewing machine
First, determine how much rope you’ll need. I wanted to use 1 1/2 laundry baskets and include a lid, but 100′ was only enough to use part of the second basket, and no lid. If you’re not sure, go with more instead of less…it’s better to end up with too much then not have enough with a break in your project.
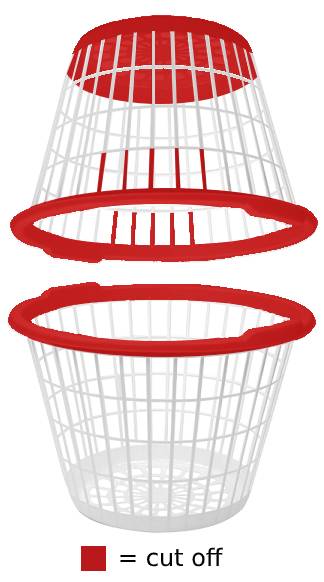
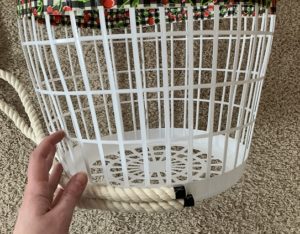
Next, cut the baskets. Take the first basket and cut off the rim only (see pic below). I used strong kitchen scissors, then jewelry clippers to cut down close.
Decide how tall you’d like it to be, then take the second basket and cut off the rim and bottom, leaving the amount you’d like for the top height (if you have plenty of rope and want to make a lid as well, save one bottom piece). Then cut 2 sections for the handles (I cut 5 pieces on each side).
I only used the first row of the second basket, but yours can be taller if you have enough rope. Whichever row is your last (top row) will need the horizontal bar across for support.
Take your white duct tape (I used what I had but white is better in case it shows through) and tape the cut edges together. You don’t want to overlap because it will push out the rope.
If you’d like your basket to have a lid (skip this part if not):
You’ll probably need at least 200′ of rope for the entire basket. To make the lid, find the middle point of the rope, fold and and begin hot gluing the 2 ropes together to the cut-off basket bottom at the center, wrapping around. Continue around the edges, covering it completely. You can wrap the duct tape around the end and cut down the middle of it to finish, or you can leave the lid attached to the basket by leaving about 4″ loose between the lid and basket. However, this will make knotting the handles a bit more challenging with the long length of rope left.
Since I didn’t make a lid, I began by gluing the 2 ends of the rope together, starting at the bottom. Keep wrapping around, hot gluing as you go, both to the plastic basket and between rows of rope, being careful that no glue shows on the outside.
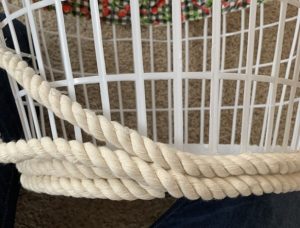
Once you get to the first cut open space, knot an infinity knot handle by looping a figure ‘8’ (see sketch below). You can loosen or tighten it as needed if it doesn’t end up in the exact right place for the opening, but once it’s knotted, glue the 2 pieces of rope together to keep the shape.

After making the 2 handles and you wrap the rope around and reach the handle area again, you can either let the rope hang down loosely to hide behind the handle (as I did), or keep it straight to keep building the height if you have more rows to add.
Once you reach the height you want for your basket, wrap the tape around the end, then cut through the tape. I angled the ends down and glued inside the basket. I didn’t have enough rope to hide the ends under the handles, but that would probably look best.
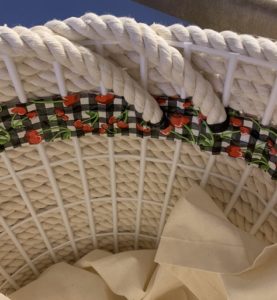
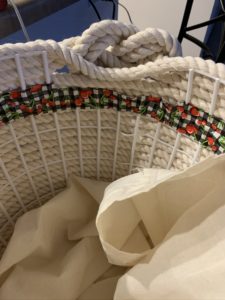
Lastly, create the lining. I used some muslin (from an old college project) since it has the same natural color as the rope. The pattern can either be a rectangle the height of the basket + the radius of the bottom circle (to gather at the bottom), -OR- a rectangle the height of the basket gathered to a circle piece in the bottom.
I laid my fabric out on a table and traced the bottom of the basket directly onto the fabric with a pen, and cut it out. I sewed a basting stitch along the bottom of the side piece, pulled together, then sewed to the circle. You can sew the side closed, or just fold it over. I gave myself extra length and overlapped the vertical edge under one of the handles.
Lastly, turn the top edge under 1/2″ and glue to the top row of rope.
If you made a basket, let me know how it went with a comment below!