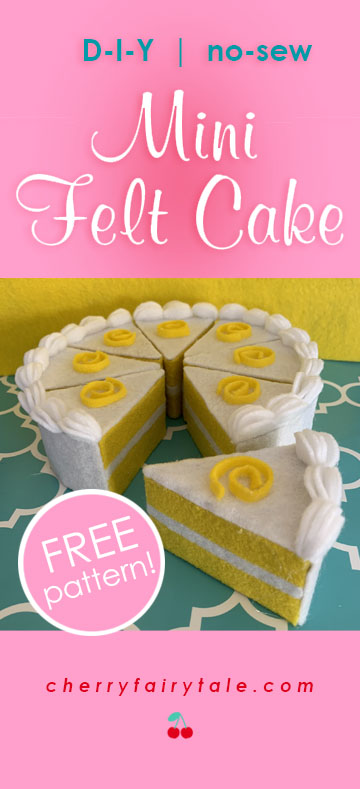
My daughter is getting a play kitchen this Christmas, and I had a detailed vision of a lemon theme which included an adorable mini felt cake. I felt it. Sorry, couldn’t resist.
The complete play kitchen post is here.
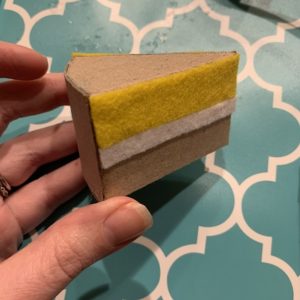
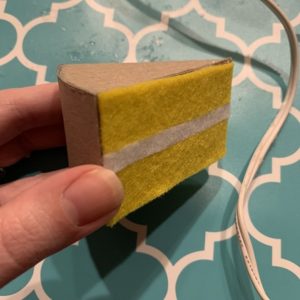
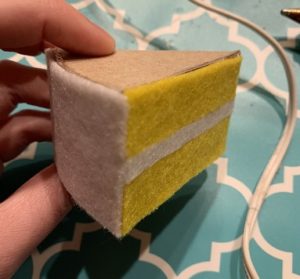
There are quite a few felt cakes out there, but they are all sewn, so they have that puffy marshmallow look. I wanted to create one that didn’t require any sewing and had the straight, sliced edges. So I made a cardboard structure and glued the felt on top.
When finished, the cake is about 6″ in diameter (with 8 slices). It’s meant for little children, so it’s supposed to be mini. If you’re concerned the hollow structure might not hold up for play, you can add stuffing to the inside so it’s harder to get crushed.
While very inexpensive, this project may take a fair bit of time. I suggest spreading it out over a few days (and always remember to unplug the hot glue gun when you’re not using it). However, the pattern making was a rather large portion of the time I spent, and that’s all done for you!
You can follow these instructions exactly to make a lemon cake, or you can make it chocolate. Or pink with strawberries. The beauty is that the pattern is merely the base, and you can go with whichever colors and decorations you like.
It’s fun to let it evolve as you go. A small strip of yellow felt strayed on top of a slice when I was gluing on the main pieces, which gave me the idea for the lemon peel. Start with your colors and go from there. Let the cake speak to you. Cake you to new places.
Materials
Chipboard (I used 2 cereal boxes, so…FREE)
Felt squares (28¢ each)
Stuffing (optional; adds sturdiness)
Supplies
Hot glue gun/sticks
Scissors (both paper and fabric)
Printer/Paper, pen
Ruler
Bone folder (scoring tool)
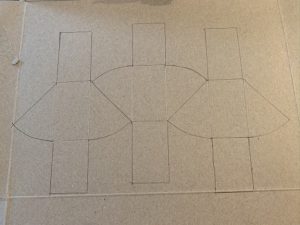
- Print my FREE pattern here and cut it out.
- Trace the slice structure onto the cardboard. Using the ruler and bone folder, score the 4 marked lines, and cut out.
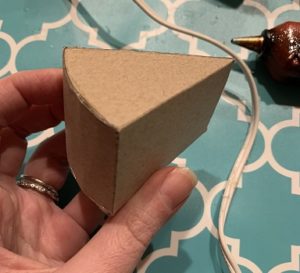
- Bend the outer ‘frosting’ side into a slight curve, then glue the edges together.
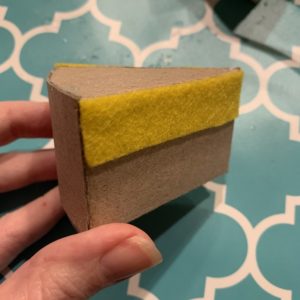
- Cut out the felt pieces (I like to start with just one first instead of all 8).
- Glue the felt to the cardboard slice, starting with one ‘cake’ layer (yellow), then the ‘filling’ (white), then the other ‘cake’ layer (yellow). Trim off any extra.
- Next, glue the outer ‘frosting’ (white), then the top ‘frosting’ (white). Trim off any extra again as needed. I left the bottom side bare, but you can add another felt piece in the cake color (yellow) if you prefer.
- Take the 12 ‘piping’ pieces, and glue 4 together on the straight edge. Repeat 2 more times to make a set of 3.
- Glue to the curved top edge of the slice.
- Take the ‘lemon peel’ and glue on the thin side into a spiral on top of the slice in the middle.
- Repeat to make the other 7 slices.
What kind of cake will you make? How did it turn out? Let me know with a comment…it’s a piece of cake 🙂
Thank you for sharing this pattern.