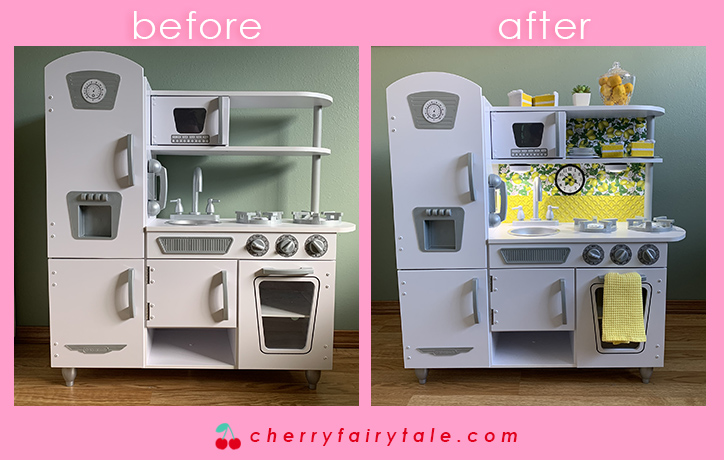
I had SO much fun doing this for Lily’s Christmas present…like when I put together her nursery. A full vision of the look I wanted hit me suddenly when I saw the plain white ensemble, then I figured it out as I went, all while keeping the cost way down low where I like it.
I didn’t want to reveal this until Christmas, but I’m posting now so that you can have time to makeover your own to be ready for a Christmas gift too.
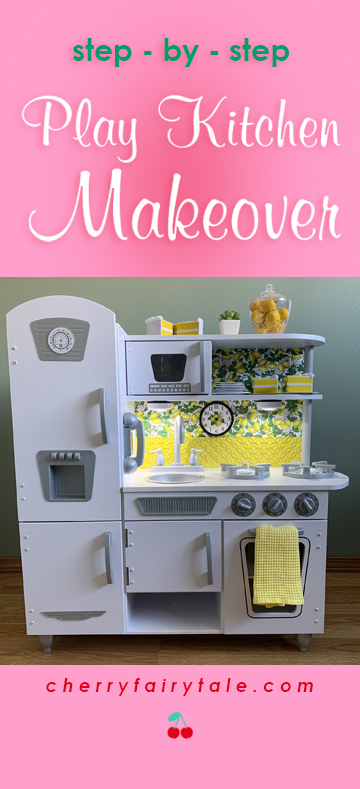
This kitchen is the KidKraft Vintage Kitchen. Of course it depends on which play kitchen you have, but you can make these steps work for yours! My handy husband put it together and said it’s pretty straight-forward to assemble, with clear instructions, extra parts, and the only tool needed was a screwdriver. I think it’s adorable, but it would be nice to have a little free counter space and a window. However, the compact size is nice for our house. I also think it’s odd how the oven opens on the side, but it looks like that’s how most play kitchen ovens are too.
Back Wall / Backsplash
Materials
Printed Paper (Wrapping Paper or Scrapbook Paper in a print you like)
Solid Color Paper (I got yellow poster board at Dollar Tree for 69¢ )
Sink Mat ($4.83 at Walmart)
Foam Board ($1 at Dollar Tree)
Supplies
Rubber Cement
E6000 (Glue)
Ruler
Pencil
Cutting Mat
Xacto Knife
Scissors
Double-Sided Tape or Staple Gun (to attach)
Once the kitchen is assembled, measure the open spaces you want to fill from the back, including the edges. It’s best to cut only one piece, if possible. My measurements were 2 rectangles connected on the right: 12″ x 5 7/8″ on top of 9″ x 21.” I drew it on the foam core then cut it out with the Xacto Knife on a mat.
I wanted a very specific lemon print (and did not want to spend $20 on wrapping paper), so I was limited to 8.5″ x 11″ sheets (I got 4 for $1 at Hobby Lobby), but it’s best to use wrapping paper since you can cut it as large as you need. I pieced 2 sheets together for each section. For the upper wall, I cut around the graphics on one sheet then glued it on top of the other. I didn’t worry about that for the lower wall since the clock covers most of the seam, but I cut out 2 leaves to glue over the top and bottom on the small area that still shows above and below the clock (because I’m a perfectionist like that).
It’s important to only use rubber cement to glue on the paper, because it dries fast and flat. If you use a wet glue like Elmer’s glue, it will bubble the paper and can even warp the foam board. If you’re not sure how to use rubber cement, apply it thinly to both surfaces, let dry, then stick them together.
Cut the sink mat to the height you like for the backsplash. I had a small space so I only cut 3 rows high (3 3/4″). The mat wasn’t long enough so I cut another piece to add. I didn’t want the thickness of the mat to make the foam board difficult to attach, not being flush with the back, so I didn’t include the edges from the back and attached it last.
Take that height you measured and add the bottom edge allowance (mine was 3/8″). Then take the full length measurement (mine was 21″) and cut out your solid color paper. Glue to the foam board with Rubber Cement.
Take the printed paper again and glue above the solid color. I didn’t even measure…I just placed on top, folded it to the edge, cut at the fold, then glued it on in 2 pieces.
Now it’s ready to be attached. If the kitchen is wooden, you could maybe use a staple gun, but mine is plastic so I simply attached it with double-sided tape.
Finally, add the backsplash. Add some E6000 to the cut sink mat pieces and press them to the solid paper section. Done!
Wall Clock
Materials
Black paint (spray paint or acrylic paint w/ brush)
Small plastic lid
Brad (brass fastener)
PVC
Self-Adhesive Laminating Sheets
Glue (I like Tacky Glue)
Copy Paper
Wrapping Paper or Scrapbook Paper (optional)
Small Command Strip
Supplies
Printer
Xacto Knife
Scissors
1/8″ Hole Punch
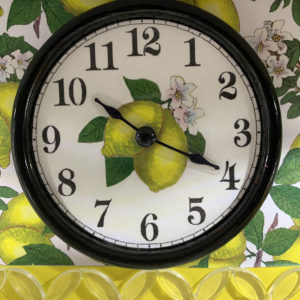
- Trim off any tab of a small plastic lid black then paint the rim. I used an 8 oz. ‘Take & Toss’ lid. Spray paint probably looks best, but I just used acrylic paint to avoid fumes (and a freezing garage). Also paint the head of one brad black.
- Find a clock face image you like (or use mine here), size it to the inner lid diameter, and print. I hope you’re not in the middle of a war with your printer like I was when I printed mine, but if you are, it may take some trial and error. It wouldn’t print from the computer so I printed from a USB drive. Wouldn’t print actual size so I scaled it in Paint. Cut a small slit (with an Xacto knife or box cutter) in the middle of the lid and the clock face for the brad.
- You can leave it classic (just black & white), or cut out a graphic from the paper you’re using for the kitchen wallpaper. I cut out graphics (from scrapbook paper), and glued in the middle. Let dry then add a piece of laminating sheet over the top and cut the whole thing out. Cut a small slit in the middle again, using the one you made on the back of the clock face as a guide. Glue to the lid, lining up the slit.
- Cut out the clock hands, then place them face-down on a piece of PVC (the clear plastic used on lots of packaging that usually just gets thrown away – save it!), then stick a piece of lamination sheet over it. Cut around them, leaving lots of extra PVC around the edges (for durability). If you have a small hole punch (1/8″), punch out the middle of the circles. If you don’t have one, carefully cut one out with the Xacto knife.
- Put it all together! Push the brad through the clock hands then the clock face and bend the brad open on the back tightly to secure. I attached it to the kitchen wall with a Command Strip.
Decor, Lights, & Play Food
The little accessories that go with the theme really add a special touch. Here are some cute, easy, inexpensive and fun things you can do.
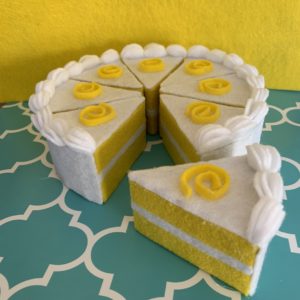
Felt Cake – Detailed post here.
Lighting – 2 push lights from Dollar Tree ($2). Comes with the adhesive, so all you need to add is the batteries.
Jar/Fruit – Plastic jar from Dollar Tree ($1), mini artificial lemons from Hobby Lobby ($2.99 w/ 40% off coupon)
Mini Plant – Artificial succulent from Dollar Tree ($1)
Dish Towel – Cut down a matching dish towel to a small size & sew the edge. I used an old white towel and dyed it yellow by boiling with some old turmeric. Both were from 1991 or before, heh!
There are so many more different things you can do, too! My friend Kelleen makes adorable children’s aprons on Etsy, or how about an oven mitt, or little curtains (if there’s a window, or make a window)? Buy some play food and dishes, make your own or up-cycle. I spray painted orange play dishes from the 70s with glossy white.
What theme do you like for your little’s kitchen? Which accessories will you add? Let me know with a comment!