Updated 4/2025 with easy beaded strap instructions!
Can you believe it’s 2025?! And what better way to start the new year than with a beautiful DIY project that you can use and feel proud of?! Especially if you get a little down in the days right after Christmas like I do! I always wanted to make my own beaded purse, and finally did it using this great YouTube tutorial I found by Crochet & Bead Designs.
Just to be extra clear, THIS IS NOT MY VIDEO. It’s just a video that I used, and it’s a good one!
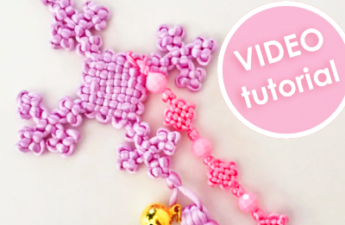
I wanted a beaded purse to wear to go see my daughter be in The Nutcracker for the first time this year, and being inspired by the Sugar Plum Fairy, I chose clear and white for bead colors to look like sugar. The song is playing in your head now, isn’t it?

My daughter loved my purse so much that she asked me to make her one too, in pink. At the risk of spoiling her, I happily obliged because she’s the only daughter I’ll ever have and I quite enjoy making them.


To help you have an easier time making yours, I wanted to share a few tips I wish I had known before I made mine…
The video starts at the front bottom edge. That means it won’t be one continuous piece and you’ll have to go back and add to it to finish the first (and largest) piece, which is the lower front, bottom, and back (see video at 7:45). The part I enjoyed the least was having to tie off the ends and add more fishing line. So I would find it more efficient to start with 4 edge color beads, then the main color beads, then finish with 4 edge color beads to complete the first row, and continue on. However, if you do this, it means that for row 8 you will need to alternate colors (edge color then main color, and so on). I didn’t think this was too difficult to do.


I couldn’t find the 2 specific size fishing lines, so I just used .021 size for the whole thing. Whether that’s mm or cm IDK (because it doesn’t actually say). Fun fact…I live in the small town in Iowa that makes Fireline beading thread! In the video it switches to smaller line for the flap to give it more flexibility, but mine seems to work just fine. I saw a comment on the video asking why theirs had no flexibility at all, and that’s probably because the fishing line is too thick.
While this particular video doesn’t show how to add more line when you run out, the same channel has another video that does, at 6:38 for quick reference. Pretty much how it works is you tie off your ends, weave them back in to hide, and thread your new long piece through the last 2 beads.
I don’t recommend clear beads it since it will of course show the insert and therefore look sort of uneven color-wise. I got the clear and white beads at Hobby Lobby, which come in packs of 360, so I got 3 bags of clear (main color) and 2 bags of white (edge color). I ordered the pink beads from BeadTin.com. I wouldn’t say they were cheap, but they were exactly what I wanted: Bright pink w/ glitter, and baby pink.
The video has a link below it to Amazon to buy the insert, but I was disappointed with how overpriced it is ($26.88), and it’s a pack of 2. It’s just strange to me how I could just buy an entire purse for that price. So I found a different one on Amazon and bought it with a Black Friday deal for $12.64. I considered making one myself, but I was working toward a Nutcracker deadline.
You can also just skip the insert and the purse will still work great (as long as you don’t put in tiny things that can fall through the openings). My daughter likes her purse without an insert and can put more things in it that way.
I ordered the O rings and didn’t realize how thick they would be, so while the listed materials includes ‘2 O Rings 25mm,’ also pay attention to the width size. Mine worked well enough but they’re a bit large-looking.
The video doesn’t show how to weave in the ends on the sides, so be sure when you weave them in, go upward toward the top of the purse (to keep the tension tight).
I did notice one small mistake in the video, which is in the front flap. After the first row she moves on to the second and adds 3 edge color beads (at 18:05), but you actually only want to add 1 edge color bead, then 2 main color beads so that there is only a single row of edge color beads on both sides. So do this, then again at the end of the row with 2 main color beads and 1 edge color bead (you can see how the video jumps at 19:56 from the full ‘cross’ shape edge color beads to the single row of the finished flap. BTW, I’m not complaining…overall it’s a great tutorial and I’m just trying to help you along the way 🙂

This was just my own idea, but instead of a chain strap, I thought a matching beaded strap would look nice. It took me a minute to figure out how to string it, but here are the steps!

STEPS:
Loop a long piece of fishing line through the hook end.
String 2 beads onto both line ends.
Add 1 bead to one line.
Loop that same line through the hook end, and pass it back through the last bead.
Thread that same line back through the center bead so that the line goes through both bead openings.
Now continue adding 1 bead to one line and 2 to the other line, then pass the first line back through the third bead to make each cross shape until desired length is reached.
Repeat the same steps for the other hook, tie a sturdy knot, then weave in the ends to hide them and trim off.
You can also just use a strap from an existing purse as long as it’s detachable.
Even though I thought I checked and double-checked, I accidentally made my purse one row wider than the tutorial. I actually like that size better since it was a bit longer and made the snap closure attaching easier due to the odd number of bead crosses. But since I wasn’t aware until the end when I was making the front flap piece, I had to completely redo it so it would fit correctly. So be sure to count the number of crosses after you make the very first row (I found it easiest to count the beads down one side to get the right number). You can of course make your purse as large or small as you like, but just be sure to check the measurements before ordering an insert and creating the flap so they will fit nicely.
These videos don’t show how to attach the magnetic clasp. It took a little trial and error, but since I had an odd number across (17 instead of 16), I attached mine by using the same fishing line and threading through a bead above the clasp, through the clasp loop, through the beads behind the clasp, through the clasp loop on the opposite side of the first loop, continuing the straight line down through a bead, turning through other beads to get to the next open clasp loop, through that loop, through the beads behind the clasp, through the last clasp loop, continuing a straight line through a bead, then threading the line through beads back to the first line end, knot, and weave the ends in to hide.
For the pink purse I made, it was more difficult attaching the clasp since it has the even number across (16). So try out what works! Tweezers help with this part.
I’m so happy to be able to check this craft off of my to-do list. What color purse will you make? Let me know with a comment, and happy crafting in the new year!