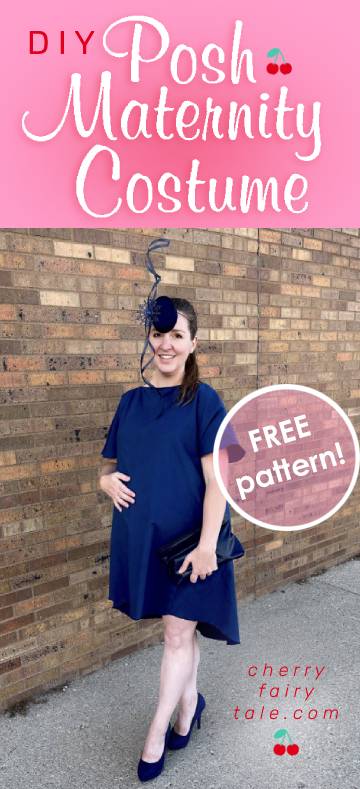
In this year 2021, there are a LOT of pregnant women, everywhere I look! And this Halloween is the only Halloween in my life where I’ll be pregnant, so I wanted my costume to be epic…I decided I would dress up in one of my most favorite celebrity looks of all time: Victoria Beckham from William & Kate’s royal wedding. She was so elegant in chic navy blue with a matching, gorgeous fascinator, clutch, and pumps, AND she was pregnant! Fun fact…she was 6 months pregnant at the 2011 wedding, with their 4th and last child, which was also their first girl.
So my next hurdle became: how to do the complete 4-piece ensemble, and for cheap?
I thought the best route would be to find a tablecloth at a consignment store and sew the dress out of it. I ended up finding an oval tablecloth (for $3), but a rectangular one would be better because I had to sew the side seams at an awkward-looking angle.
For the fascinator, I bought other fabric, but I could’ve just used the extra pieces from the table cloth. It wouldn’t cost much to buy a separate fabric for it because you only need a little, and it has a more silky look than the dress. I made my own pattern (which you can use too and print for FREE here), and for the embellishments I bought a pack of snowflake ornaments at Dollar Tree ($1), and made the twists from a paper towel roll.
I also found a navy clutch purse at the same consignment store for $1, but couldn’t find the right shoes. So I checked Poshmark and found the perfect pair of faux suede pumps from Maurices for $7, but they were essentially free because I had just sold something from my own closet. Also, since I’m uncomfortably 8 months pregnant, I walked around in my pumps for a test run to see if I could actually do it for trick-or-treating. It went well except skin started rubbing off my toes, so I will need to wrap my toes with bandaids. Plan to be as comfortable as possible! Get some pads for the balls of your feet or Dr. Scholl’s inserts, or whatever you need. I also like support wear under my clothes for optimal comfort when walking.
So I’d say my grand total spent was $5! Pretty awesome if I don’t say so myself.
Now for the steps! A fair bit of sewing skills and of course a sewing machine are required, so if that’s not your thing, you may have to search for something similar already made. I found it helpful to keep trying it on as I went, using safety pins to make sure I was sewing in the right places.
— DRESS —
Materials
Tablecloth – navy blue
Thread (matching color)
Supplies
Sewing Machine
Fabric Scissors
Pins
This is a loose guide as the measurements depend on the size of your fabric, and the size of you! Also, the drawing below is not to scale; it is just for reference.

- Lay the tablecloth flat and fold it over so that one side is longer; this is because the back of the dress drapes longer. The length depends on your own height. I used the entire length and draped the back side lower by 9,” but this made it too short in front so 4″-5″ longer would be better.
- Cut 12.5″ across the top middle to make the collar. Then cut a curve 1″ down on the front side.
- Starting about 18″ from the collar opening, begin cutting perpendicularly then curving slightly, to create the sleeve. Stop when you reach about 12″ down and 6″ from the collar opening. Repeat on the opposite side for the other sleeve.
- Cut the skirt by starting at the bottom of the sleeve and angle out to the bottom edges where they meet. Trim off the skirt corners into a smooth, continuous curve.
- Pin the bottom sleeve edges and side skirt seams together then sew (I did my sleeve seams wrong, on top instead of the bottom. You can also sew on separate pieces for the sleeves if you have the skills).
- Turn & turn the sleeve openings 1/8″ and 1/8″ and top stitch to finish.
- Turn & turn the collar edge in the same way to finish. Done!
— FASCINATOR —
Materials
Fabric – navy blue (can use tablecloth scraps if desired)
Thread (matching color)
Snowflake Ornament ($1 pack of 10 from Dollar Tree)
Acrylic Jewels – navy blue (optional)
Acrylic Paint – navy blue
Chip Board (cereal box)
Paper Towel Roll
Tape
Twist ties (or other way to attach embellishments)
Thin Elastic or Hair Comb or Hair Clip (to attach to head)
Supplies
Sewing Machine
Fabric Scissors
Paper Scissors
Pen or Pencil
Bone Folder (scoring tool)
Hot Glue Gun/Hot Glue Sticks
Pins
Paintbrush
Printer/Paper (for pattern)
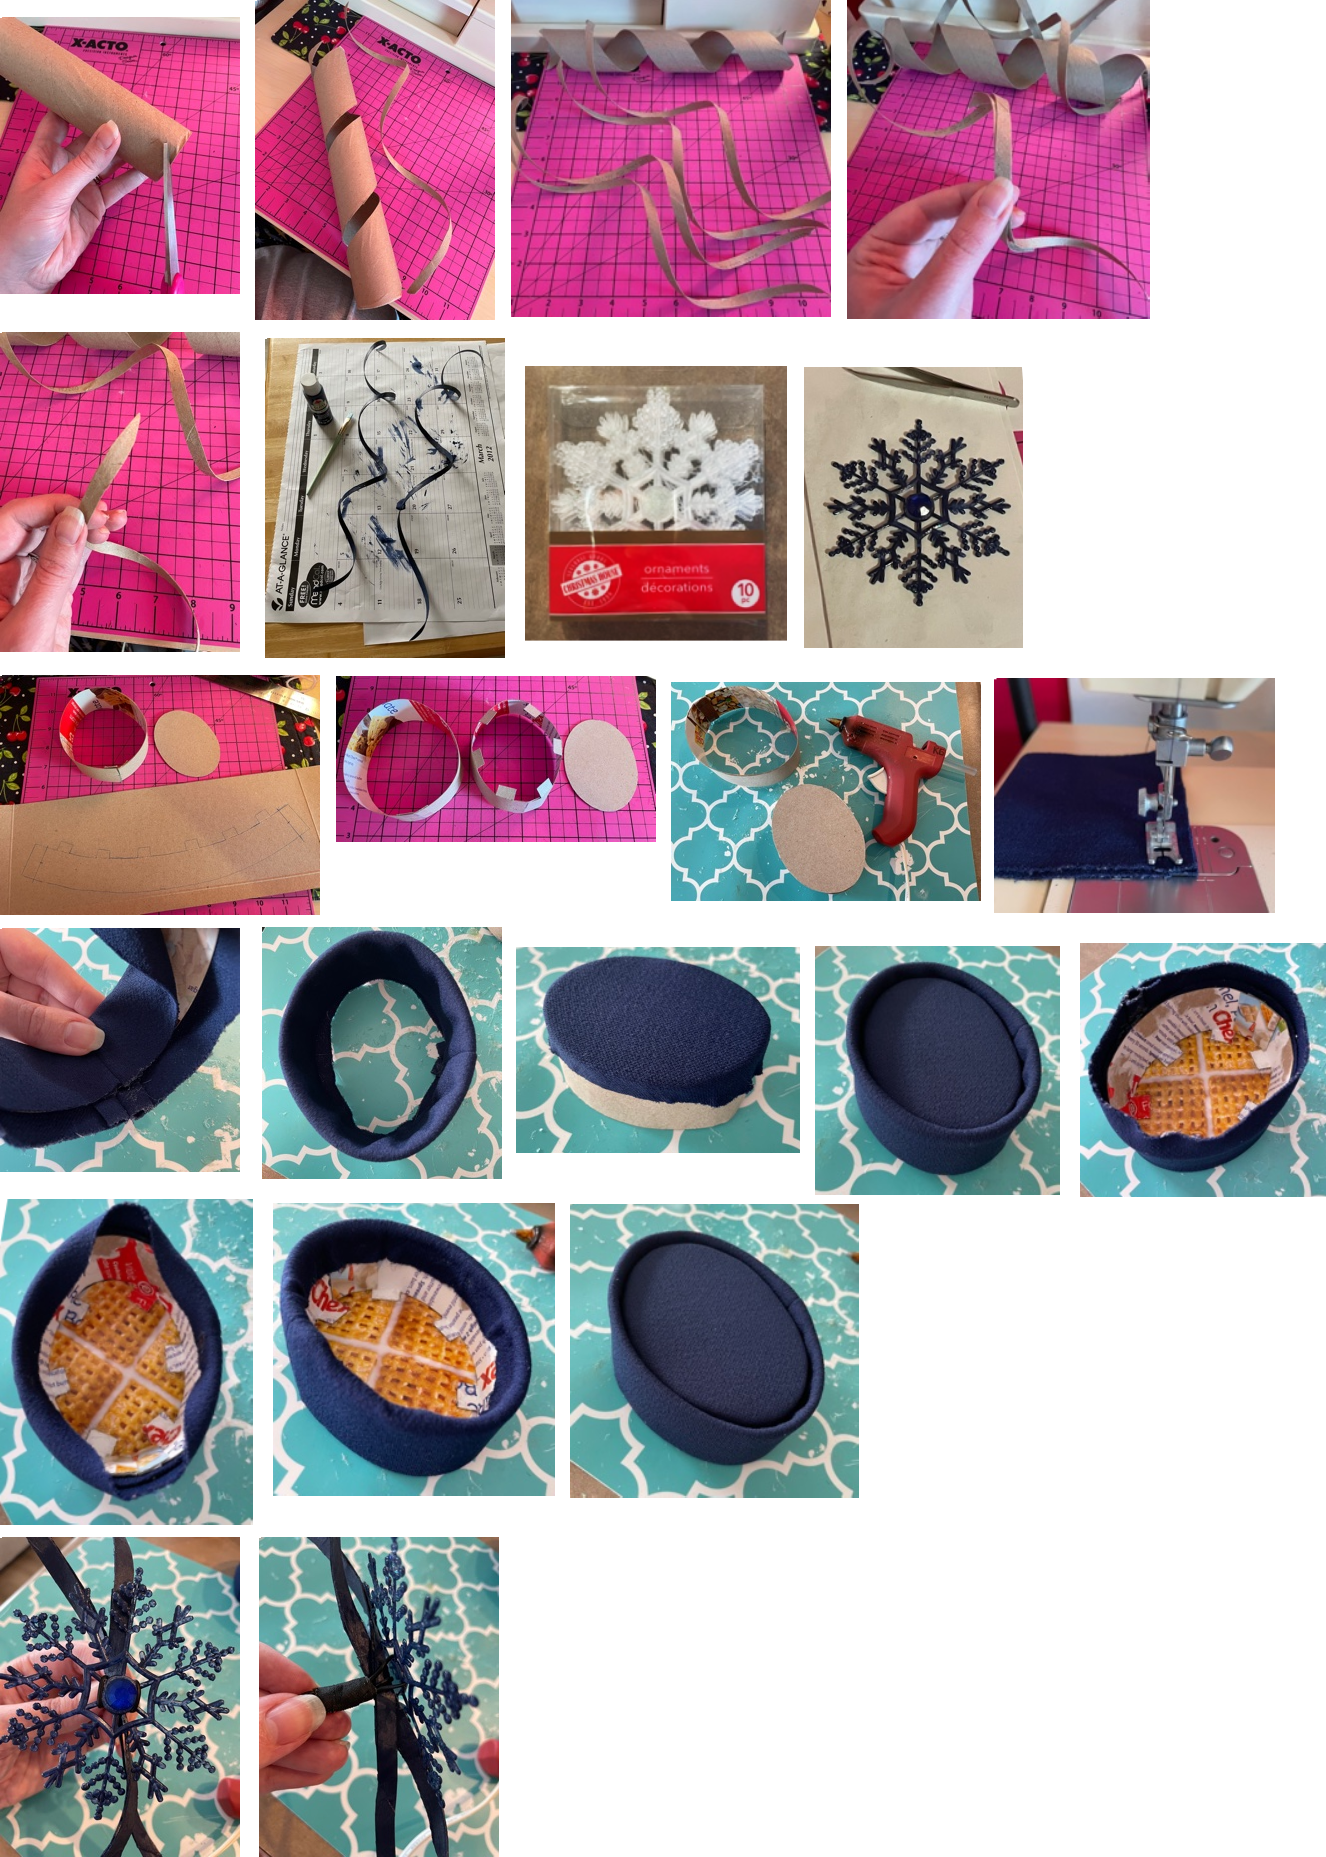
- Take the paper towel roll and cut along the entire seam edge.
- Cut again, 3/8″ from first cut, to create a long, curled strip.
- Cut 3 more times to have 4 long, curled pieces total.
- Overlap 2 pieces together in the middle just 1″ – 2″ and hot glue. Repeat with other 2 pieces.
- Trim the 4 remaining ends into points.
- Paint the 2 curls navy blue.
- While your paint is out, paint a snowflake ornament navy blue also. Glue on any jewels as desired.
- Print the pattern (link at beginning of this post) and cut out. Lay the 3 board patterns on top of board (flat cereal box), trace, and cut out with paper scissors (or Xacto knife with cutting mat). Score the tabs.
- Close the 2 brim board pieces by sliding the 2 end cuts over each other with flaps to the inside. Secure with tape.
- Fold in the tabs (of inner brim board piece) and hot glue the top board piece on top of the tabs.
- Pin the 2 fabric patterns to your fabric and cut out with fabric scissors.
- Sew the short ends together of the outer brim fabric with 1/2″ seam allowance. Fold it over the outer brim board with the seam on the long, right side, lining up the inner fabric edge to the board edge. Make sure the seam is open flat.
- Glue the top fabric piece tightly to the edge of the inner brim piece.
- Place the inner brim inside the outer brim, lining up the bottom edges.
- Tightly glue the outer brim fabric up to the inside. I find it best to first glue 2 opposite sides, then the other 2 sides, then the rest to keep it even.
- Once the paint is dry, arrange the 2 twists how you like and secure them together where they meet with hot glue. I did this in 2 places (in the middle of the top half and the middle of the bottom half) and it keeps them secure instead of flopping around.
- Secure the snowflake to the center of the twists. I used black twist ties for this, then wrapped tape around the ends to stick inside the fascinator.
- Glue (or attach) the embellishments between the inner & outer brim on the right side where the seam is to cover it up.
- Lastly, glue the ends of some elastic to the inside, or a hair comb or clip…whatever works best for you. Remember that if you will be getting in and out of a car that you’ll need to be able to remove it then reattach it. Done!
I’d like to say a quick thanks to my mom for being my free photographer. Make sure you get pictures of yours too.
Get ready to turn some heads with your posh maternity costume and let me know how yours turned out with a comment!