You know how mother-in-laws get a bad rap? While horror stories out there seem to support the theory that they are all evil, I love mine. She loves me too. And, she loves snowmen.
Who doesn’t like snowmen? Growing up, I made my own snowman (or woman) every year and watched The Snowman (even though the ending never failed to thoroughly depress me). Snowmen bring a feeling of warmth and merriment in the middle of winter.
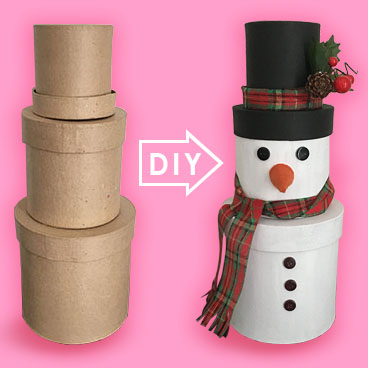
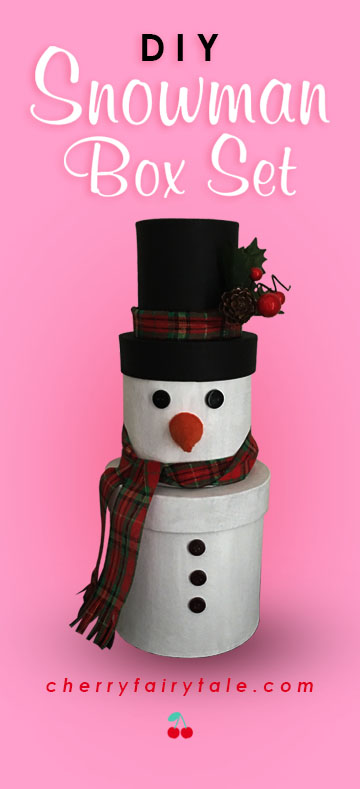
Last Christmas I wanted to get my mother-in-law a snowman stacked box set and fill it with various gifts. As usual I just pictured it in my head. And as usual, I went out to find one, couldn’t, so then made one myself! It was so inexpensive, easy, and fun (my 3 top craft qualifications), so I’m glad to share it with you step-by-step.
You can do exactly as I did, but you can also have fun making it your own…maybe you want a cute, smiling mouth, or brown pipe cleaner arms, or even a pipe! Make it a snow-woman. Use glitter paint to make it really sparkle like snow. Whatever jingles your bells.
Materials
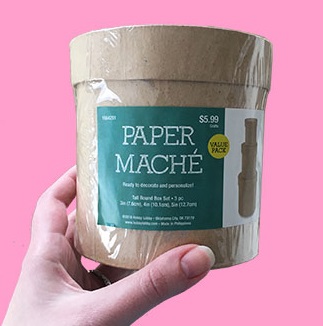
– Paper Mache Triple Box Set ($5.99 at Hobby Lobby but use the 40% off coupon!)
– Holly Sprig (only like 60 cents!)
– Black & White Acrylic Paint (again, only like 60 cents each!)
– Ribbon (Stiff if you want to clip ends for the scarf)
– Orange Felt, Foam Sheet, or Card Stock (for carrot nose)
– 5 Black Buttons (or pom poms, or felt or foam cut circles, or just marker)
Supplies
Hot glue gun/glue sticks
Paint Brush or Foam Brush
Scissors
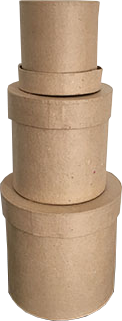
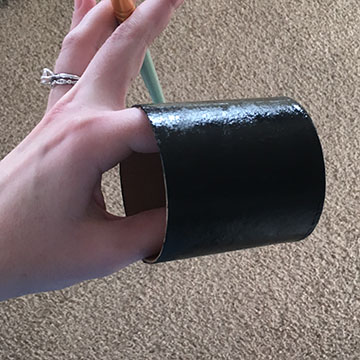
First, paint the top (smallest) box black, including the bottom, but not the lid, which will make the ribbon part of the top hat and will actually sit upside-down. I found the easiest way to paint is holding from the inside to allow you to paint it all at once. Also paint the lid of the middle box black, which will be the hat brim.
Next, paint the middle box white, and the entire bottom box white. It’s not necessary to paint the bottoms since they won’t show.
While the paint dries, hot glue the holly sprig to the outside of the small box lid.
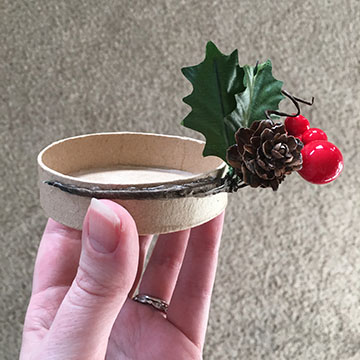
Glue the ribbon over the top of the sprig stem and to the lid. Fold the extra width over the inside edge and glue. Keep the glue layer thin so that the box can still fit into the lid!
Cut out the carrot nose in your orange material and desired size. There are many ways to do it, but it will probably be a wide triangle with a curved bottom edge. Carefully hot glue together along the straight edges into a cone shape, then glue to the middle box where you’d like the nose to be.
If the paint is dry, hot glue 2 buttons above the nose for eyes, and 3 buttons to the bottom box for, well, buttons!
Wrap more ribbon around the base of the middle box for the scarf, tie, and hot glue in place. If the ribbon is stiff enough, you can clip the ends to give it more of a scarf look. Stack it all together (with the top box upside-down) and admire, or fill with gifts and secure with gift wrap ribbon. The box set is also a gift in itself, which makes it unique, especially when it’s made by you.
What does yours look like? Let me know with a comment below!