My daughter and I love K-Pop Demon Hunters, and now after she got to be Mira for Halloween, we are onto K-Pop-ifying the next holidays! Just like the Huntrix girls, my daughter also loves Ramen, and when I saw a cup noodles ornament at a store, I wanted to get it for her, but it just wasn’t very cute…it didn’t even have noodles. I saw a cute one in my head and figured it wouldn’t be too hard to make.
Well I was wrong, making the pattern was more difficult and took much longer than I expected, but the good news is…the hard part is DONE and you get to just print it and make it…for FREE!
You will need:
Materials
White Foam Sheet – thin (1/16″ thick)
White Foam Sheet – thick (1/8″ thick)
1 Sheet White Copy Paper
Lamination Sheet
White 3-Ply String – 30″
Paint: Golden Yellow, Dark Green, Reddish-Brown
Clear, Flat PVC – a small piece (can be found on packaging)
1/8″ Green Ribbon (for hanging; you can use whatever ribbon or string you like)
Supplies
Color Printer
Scissors
Hot Glue Gun/Hot Glue Sticks
Clear Tape (or use lamination sheet)
Paintbrush, Water in a cup
Toothpick
Awl (poking tool which can be found in the leather crafts section)
Start by printing the FREE PATTERN HERE. Add a piece of lamination sheet on top of the side (the part that says CUP NOODLES) and the brown top. Cut them out along with all the pattern pieces.
Take the thinner foam sheet and place the pattern pieces on top to cut them out. Curve the foam cup side piece and hot glue together along the 2 flat edges. If it’s easier you can also use a piece of tape or lamination sheet to hold it closed on the inside.
Attach the cup bottom with hot glue.
Hot glue (or use tape or lamination sheet) the label on top of the foam cup side.
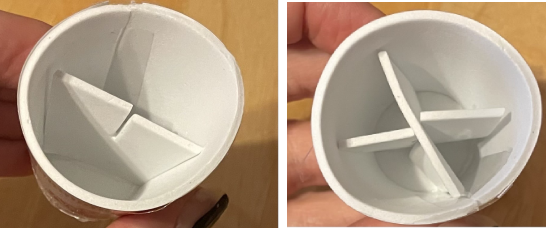
Slide the 2 inner stand pieces together to form a cross (+) shape and glue it to the bottom inside the cup.
Glue the brown circle to the top foam piece, then glue it inside the cup to the top of the stand.
Cut (3) 10″ pieces of string and gently pull away each ply so you have 9 total pieces. Add a small amount (pea-size) of yellow paint to a cup with a little water, and put in the string pieces to turn them yellow. Remove them and let dry.
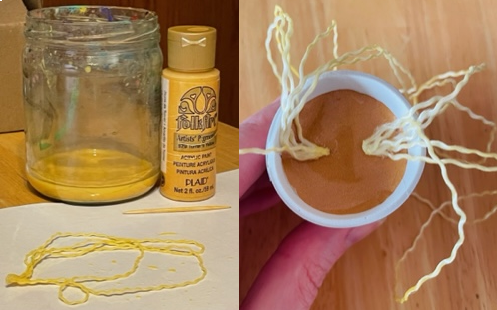
Once dry, take 3 strings and glue the 6 ends together. Glue to the brown circle, curving in a way that you like. Repeat for 3 more strings to fill up the top.
Now for the chopsticks! Take your thicker foam sheet and cut a long, narrow triangle about 1 1/4″ long (I did not put a pattern for this because the small scale is too difficult to cut around), then cut it down the long center to create 2 chopsticks. It’s hard to tell in the photos but they are tapered. Paint them with the reddish-brown paint & let dry.
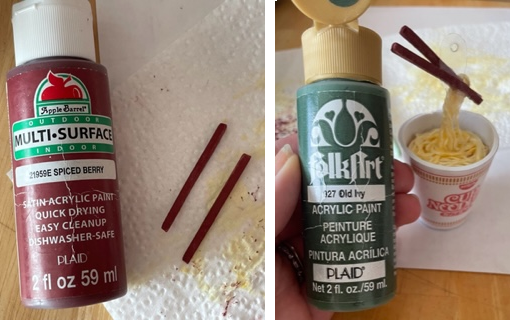
Cut out a small piece of PVC (I made an oval 3/8″ x 3/4″) and poke a hole on one side with the awl.
Glue ONE chopstick angled 45 degrees downward onto the PVC.
Take the last 3 strings, fold them in half twice and cut the curved ends on one side (there will be 12 total), leaving the other side curved, then trim down to about 1 1/4″ long and glue the ends together. Put the PVC chopstick end through the curved end of the strings and twist them, securing with a small amount of hot glue. Then hot glue the string ends to the middle of the top of the cup.
Take the other chopstick and glue it over the top strings, angling slightly so both chopsticks show.
Use a toothpick with the dark green paint to add little specs like herbs onto the noodles. It works best to only touch it to a single string so it doesn’t look split across the strings.
Take a small length of ribbon or string and loop it through the PVC hole and knot…you’re done!
When sharing your creation online, please be sure to tag me with CherryFairyTale and THANK YOU!