***UPDATED 1/28/2021: The final product is now available to buy in my Etsy shop (link at top of page)! Also, I corrected the pattern on the second round of the crust.***
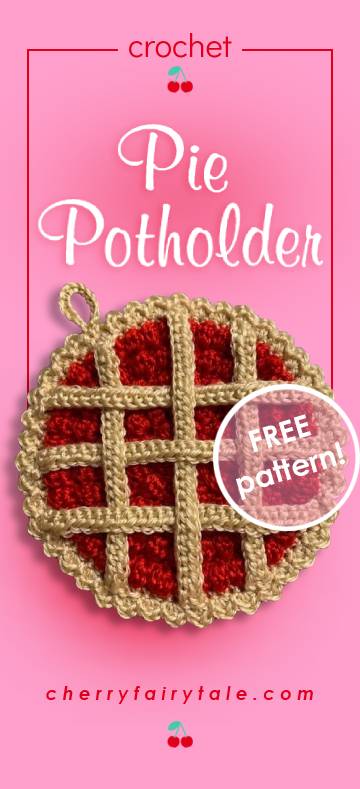
If I told you I have a theme for my kitchen, I’m sure you can guess what it is! My yarn group shared a photo of a crochet pie potholder and I knew I had to make a cherry one. But I wanted it to have bumpy berry shapes, so I found the Bobble Stitch, my new favorite.
After I finished I shared a photo with my yarn group and was (pleasantly) surprised there was so much interest, so I am sharing my pattern for everyone here! There are various patterns out there already, so this is my version, and you can change it if you like. I love the bumpy berries but maybe you’d like more simple with a flat ‘filling.’ Maybe you’d like more lattice on top. Or not at all. Maybe your taste is more blueberry or raspberry. Make it the way you like!
I have only been crocheting for 2-3 years now, so if you have any feedback for me on anything I need to know or change (or just suggestions), especially with pattern writing, please leave me a comment below!
MOST IMPORTANTLY, if you are going to use as a real potholder, it will need to be made of COTTON or WOOL YARN to handle high heat. I made mine more as a decoration with acrylic…I don’t plan on using it in the oven at all. Acrylic yarn is synthetic material so it melts instead of burns. If the cotton gets too hot, it burns away. Another flat, circular layer on the bottom may also help (in the crust color).
Skill Level: Intermediate
Finished Size: 8″
KEY
SC = Single Crochet
SL ST = Slip Stitch
STS = Stitches
CH = Chain
BB = Bobble
YO = Yarn Over
ST = Stitch
HDC = Half Double Crochet
DC = Double Crochet
SK = Slip Knot
FHDC = Foundation Half Double Crochet
Start with your berry color and use the bobble stitch. The bobbles will naturally pop out to the back side of your work; you can push them to the front as you go if you prefer.
1. 6 SC into Magic Circle, SL ST to join = 6 STS
2. CH 1
3. 1 SC (into join), 1 BB in SAME stitch
(BB is: YO, insert hook, pull thru, YO, pull thru 2 loops;
Repeat 3 more times for total of 4;
Complete with YO and pull thru all 5 loops)
Repeat around, SL ST to join = 12 STS
4. CH 1, SC2 around (2 SC into each stitch), SL ST to join = 24 STS
5. CH 1
6. 1 SC (into join), 1 BB in NEXT ST; repeat around, SL ST to join = 24 STS
7. CH 1
8. 1 SC (into join), SC2; repeat around, SL ST to join = 36 STS
9. CH 1
10. (same as step 6) = 36 STS
11. CH 1
12. (same as step 8) = 54 STS
13. CH 1
12. (same as step 6) = 54 STS
13. CH 1
14. (same as step 8) = 81 STS
15. CH 1
16. (same as step 6) = 81 STS
You will now have 5 rows of bobble stitches.
Now for the crust! With a tan-colored yarn…
1. Standing SC all around the ‘filling’ to begin the crust edge.
Standing SC is: SK, insert hook, YO, pull thru, YO, pull thru both loops, SL ST
I wonder if BLO (Back Loop Only) would work better for this to make it stand up instead of laying flat.
2. In same ST: 1 HDC, 1 DC, 1 HDC; SL ST in NEXT ST, repeat around to create scalloped edge; SL ST to finish.
Next is the lattice crust.
It also looks cute without if you prefer!
Make 6 FHDC pieces, 2 of them 28 STS long and 4 of them 27 STS long.
The length may need to be adjusted based on the gauge.
If you’re like me and don’t care for FHDC, you can CH the length first then SC back along the chain.
FHDC is SK, CH 3, YO, insert hook in THIRD ST from hook, YO, pull thru 1 loop, YO, pull thru 3 loops.
Use a yarn needle to sew the pieces to the crust edge.
Layer the pieces like a basket (over, under, over, under).
Weave in all the ends.
You can also make a flat, SC circle and attach it to the back for an added layer, connecting it together with the ‘filling’ when you make the crust edge.
And one more option is a small chained loop if the potholder will be hung up.
Special shout-out to my yarn group for all the love, help & support! You all are the best and I continue to be inspired by you daily.

What hook size do you recommend.
Hi! I used an H hook (5mm) but you can use whatever size you prefer, or just what is recommended on your yarn label.
I’m just starting the cherry pie pattern…it says 4BB in each stitch for a total of 12 stitches…there are 6 stitches in the magic circle…wouldn’t that make it 24 total? I’m probably misunderstanding…not sure
Hello Earlene, I think I confused you with the pattern, I’m sorry! I have now corrected it. It should say ‘1 BB,’ not ‘4 BB.’ I had it in my head that when you make a bobble stitch, you yarn over 4 times. So the first step is a magic circle of 6 (SC) stitches, then when you start the bobble (BB) stitch, you do 1 SC then 1 bobble into each of the 6 stitches, making a total of 12 stitches. I’m sorry for the confusion but I hope you can keep going…thanks for your question!
In step 6, we agree that there is 24.
Using your pattern SC2 around would lead to 48.
Did you mean to “SC2 and then SC1” and repeat?
Hello Holly, I believe the pattern is correct as written…step 6 is an alternating SC then BB pattern all the way around. The previous row also had 24 STS; it is a slow increase with every 2 rows having the same number of stitches (next is 36, 36, 54, 54, 81, 81). Hope that makes sense!