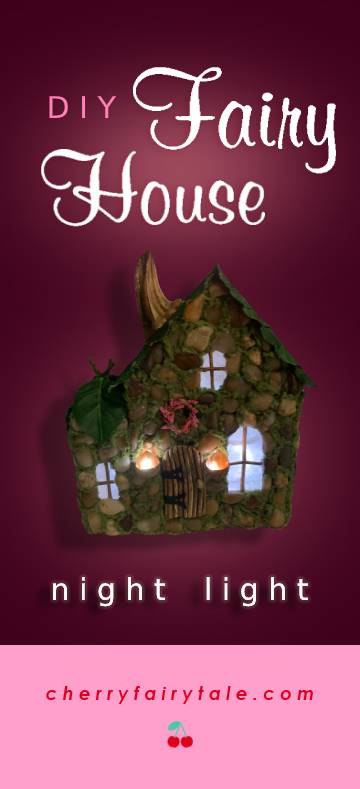
Once again I’m focusing on the ‘Fairy’ of Cherry Fairy Tale!
When my daughter was born, I made her a baby mobile of fairy foxes, and also planned on making a light-up fairy house to go with it, as a nightlight. But with being a new mom, I couldn’t find the time. Now that she’s 2 1/2 years old, I finally got to it, and I’m quite happy with how it turned out.
Materials
Cardboard House (or just cardboard to make your own house)
LED String Lights (I used white)
Twigs (about 1/4″ wide)
2 Acorn Cupules (the little beret hat the acorn wears – optional)
Rocks (need to be small & flat; I got mine at Dollar Tree)
Yarn (in moss green)
Pumpkin Stem
Artificial Leaves
Artificial Flowers (tiny size for wreath; optional)
Copy Paper (only 1 sheet needed)
PVC (clear plastic found on packaging)
Paint (optional – black for chimney top/door hinges & metallic gold for front lights)
Supplies
Hot Glue Gun/Hot Glue Sticks (or grout)
Elmer’s Glue
Scissors (both paper & fabric)
Xacto Knife (or box cutter)/ Cutting Mat
Wire Cutters or Clippers
Paintbrush (if painting; optional)
Tape (I used masking tape)
I would’ve had a much easier time if I had gone in the RIGHT order, so let me save you the trouble:
1. Cardboard Structure (build/remove/cut away as needed; include opening for string lights to go inside)
2. Windows (add twigs, glue paper inside)
3. Sconces (if you are doing them)
4. Rock Walls
5. Roofing (leaves)
6. Chimney (pumpkin stem), door, any final details (such as the wreath; optional)
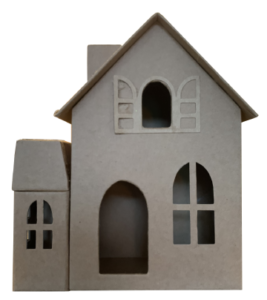
I started with a cardboard house that I found at Walmart, meant for a haunted house Halloween craft. The advantage of starting with an already-assembled structure is the sturdiness, and you don’t have to measure it yourself. But a more curved, Dr. Seuss-style would look more fairy, whimsical, natural, and just cute. If I make another that’s probably the way I’d go, but yours is up to you!
I removed the bat, shutters, chimney, and side structure, saving the pieces in case I could use them later (which I did, for the door hinges). The chimney and side structure just popped off easily since they are separate pieces.
I knew I wanted the lights to shine from all the windows, so I cut openings where the side structure connects to the main house. Leave any parts separate for now so you can easily work on the windows.
Next, I cut an opening in the bottom for the lights to go inside, with a small hole for the cord to pass through. But it may be better to do this on the back so that you have easy access to the windows, and it won’t sit on top of the cord.
Next, I cut out all the window frames, because I wanted twigs instead for a more natural look. I took a walk and collected some twigs from weeds growing over the sidewalk that no one would miss. I clipped small pieces of twigs and hot glued them into the openings. To get them the right size, I’d hold the twig over the opening, then cut it just a little long, so I could trim down as needed until it fit. If they look a little uneven and twisted, that only adds to the fairy charm!
Next, cut rectangles of your sheet of paper, and glue inside with Elmer’s glue.
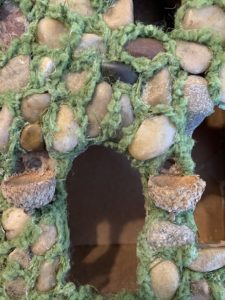
Now add the parts that the rocks will need to go around, such as the front lights, or any other pieces you want to add (such as an awning, front steps, porch, etc.). I attached the cupules (acorn tops) with hot glue, then used my blade to make a hole for the lights to go through. If you do this, take your lights and push them through to be sure you have the right size holes.
Next is the rock wall…finally those skills we refined playing Tetris pay off! I put all my rocks into an open container so I could easily sort though them to find the nice and flat ones (and when it was all done I had plenty left over from that little bag I got at Dollar Tree). I started at the top peak (under the roof), fitting them together as closely as possible (touching or almost touching), then went around the windows.
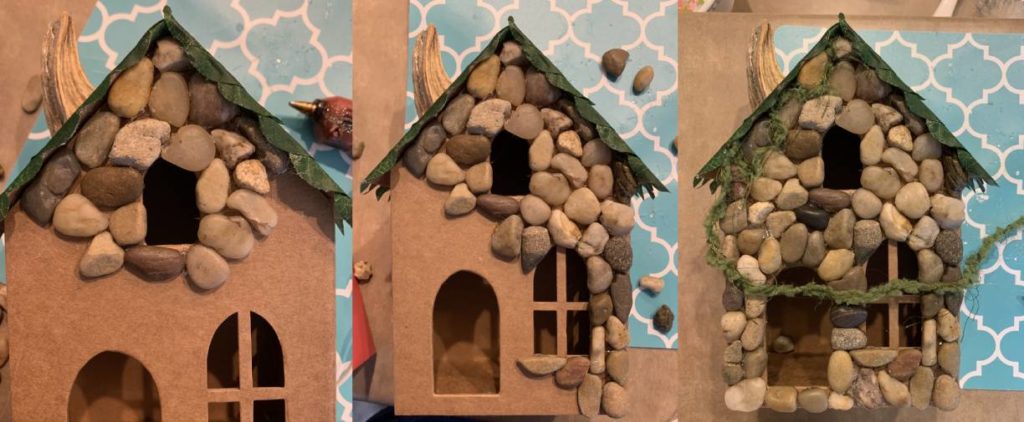
If you prefer, grout may be easier than hot glue. Since both the hot glue and rocks are smooth, they can fall off, so it works better to glue around the rocks instead of behind them.
Once all the rocks of a wall are attached, hot glue the yarn between them. It does not have to go between all the rocks, but it helps keep the rocks in place.
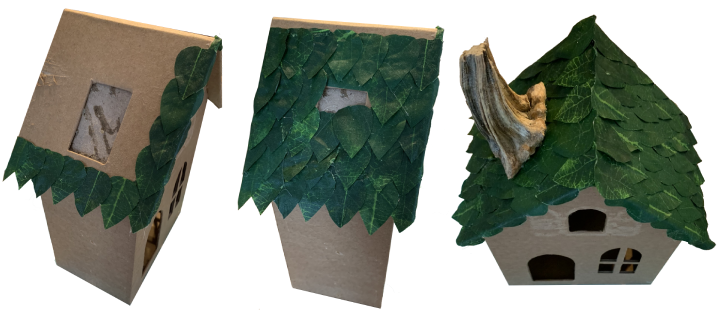
Now add the leaves for the roof. I cut my leaves small to look like little shingles, but keep in mind if you use large leaves, that will help it look like a small-scale, fairy-size house! I layered small leaves for the larger roof (starting at the bottom edge and working up) and 4 big leaves for the smaller roof, crossing the stems at the top.
Finally, attach the detail pieces. For the chimney, I used a pumpkin stem with a sharp curve so that when I attached it flat to the roof, it stands perpendicular. I also painted a little black on the tip to make it look like smoke has really come out of it.
To make the door, I cut the shape I needed out of cardboard, then hot glued twigs on top. Then I cut the shutter pieces I saved into shapes that I liked for the hinges, painted them black, and glued them on. Lastly, I went outside to find a tiny rock for the handle and glued it on. If your door has a hole behind it like mine, the light may show around it, so I put a piece of black paper behind it to block out the light.
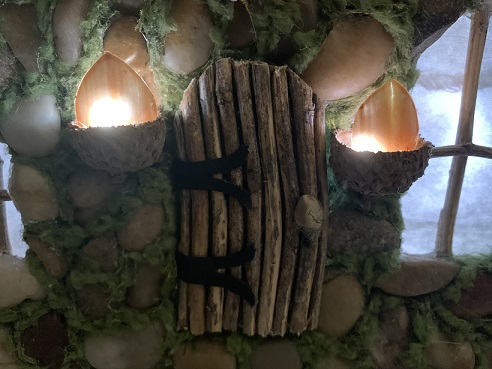
For the sconces, I cut 2 acorn shapes out of PVC then painted them metallic gold (gold glitter nail polish would be awesome too), then after they dried I glued them into the front of the cupules.
Add any other details, like a tiny wreath, front steps, a porch, or even fairy silhouettes you can cut out of cardboard and put behind the windows. Make it your own!
Now you’re ready to make it shine…add the lights! I used LED lights because they are cooler than regular lights. You don’t want a potential fire hazard if the lights warm up against the cardboard or paper. Start with the end of the string lights, putting one into the sconce, securing with tape on the inside, then the next light for the other sconce. Close your flap, allowing the end of the cord to pass through the small opening you made.
Plug it in and imagine all the magical things the tiny fairies inside are up to!
What kind of fairy house will/did you create? Let me know with a comment and have a fairy-tastic day!